
Craving a creamy, chocolate-dipped frozen dessert? Look no further than this Homemade Eskimo Pie Popsicle recipe, a treat that’s easy to make, rich in flavor, and endlessly customizable. Forget store-bought options loaded with preservatives—this homemade version gives you control over ingredients while delivering the same nostalgic taste you love.
Why Make Homemade Eskimo Pie Popsicles?
✔ Simple Ingredients – No mystery additives, just wholesome flavors.
✔ Quick & Easy – No fancy equipment needed, just basic kitchen tools.
✔ Fully Customizable – Experiment with flavors, coatings, and toppings to make them your own.
✔ Perfect for All Ages – A fun treat for kids and adults alike.
The best part? You don’t have to be a pro chef to make them! Whether you stick to the classic vanilla and chocolate combo or try fun variations like fruit swirls or nutty toppings, this guide will show you how to make the ultimate Homemade Eskimo Pie Popsicle with ease.
Ready to get started? Let’s dive into tips, tricks, and flavor variations to make your chocolate-dipped popsicles perfect every time!
Table of Contents
The Ultimate Guide to Perfect Homemade Eskimo Pie Popsicles
Creating the perfect Homemade Eskimo Pie Popsicle goes beyond just mixing ingredients it’s about mastering the right techniques for a creamy texture and flawless chocolate coating. Follow these pro tips to ensure your popsicles turn out smooth, rich, and irresistibly delicious every time.
Key Tips for the Perfect Homemade Eskimo Pie Popsicle
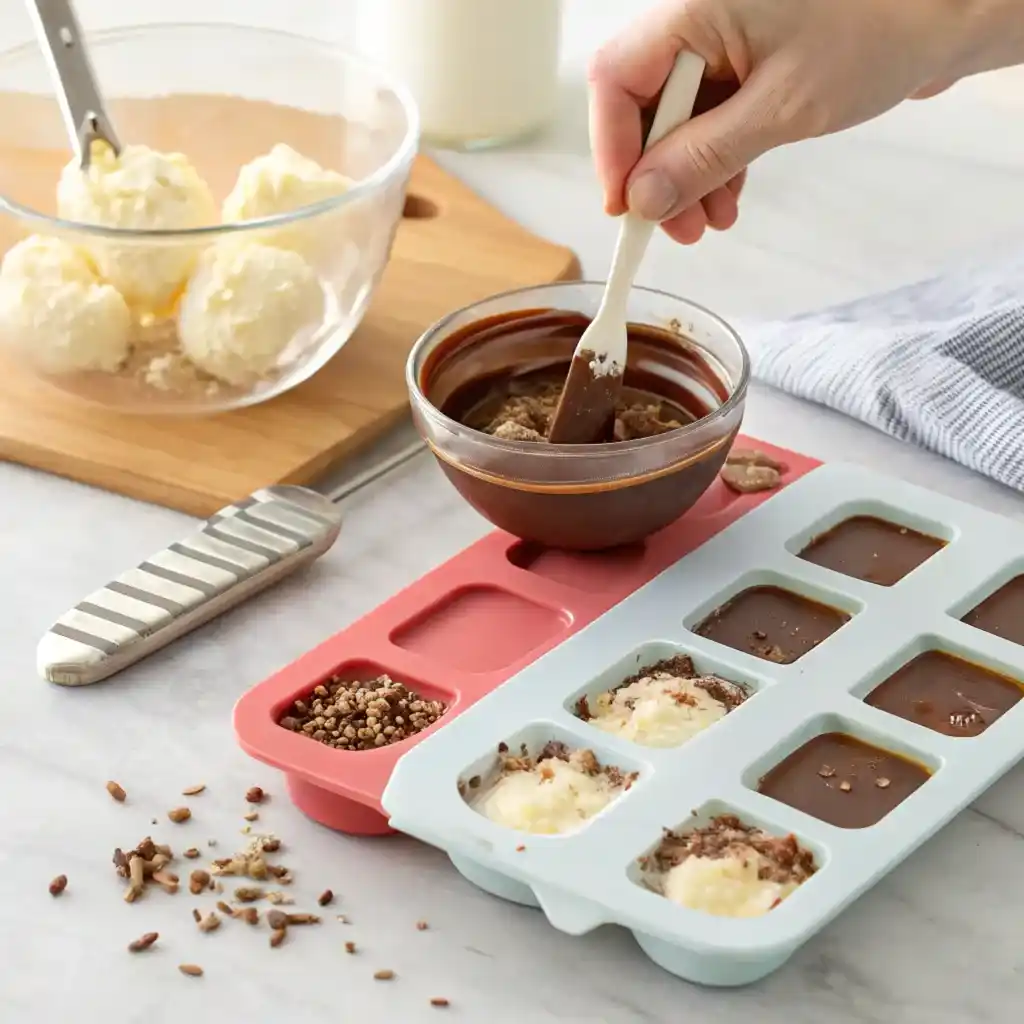
✔ Soften the Ice Cream for Easy Molding
Using rock-hard ice cream straight from the freezer makes it difficult to evenly fill popsicle molds. Instead:
- Let the ice cream sit at room temperature for 5–10 minutes until slightly softened.
- Stir gently to remove air pockets and ensure a smooth, even texture in the mold.
- Avoid over-melting, as this can lead to icy, grainy popsicles instead of a creamy consistency.
✔ Achieve the Perfect Chocolate Coating
The signature chocolate shell of a Homemade Eskimo Pie Popsicle should be smooth, crisp, and evenly coated. For best results:
- Use high-quality chocolate (semi-sweet, dark, or milk) for the richest flavor.
- Melt chocolate slowly using a double boiler or microwave in short 15-second intervals, stirring frequently.
- Add 1–2 tablespoons of coconut oil to help the chocolate harden evenly and create a silky texture.
- Dip the popsicles quickly while frozen—this ensures instant hardening of the chocolate.
✔ Freezing Tips for Perfect Popsicles
Proper freezing ensures firm, well-shaped popsicles that don’t crack or melt too quickly. Follow these guidelines:
- Place popsicle molds on a flat surface in the freezer to prevent uneven shapes.
- Allow at least 6 hours of freezing time (overnight for best results).
- After dipping in chocolate, lay popsicles on a parchment-lined tray to prevent sticking.
Flavor Variations to Customize Your Popsicles
One of the best parts of making a Homemade Eskimo Pie Popsicle is experimenting with flavors and add-ins. Here are a few exciting variations to try:
🍃 Mint-Chocolate Delight
- Add ½ teaspoon of peppermint extract to the melted chocolate for a refreshing flavor twist.
- Garnish with crushed peppermint candy for extra crunch.
🥜 Peanut Butter Swirl
- Mix 1–2 tablespoons of peanut butter into the ice cream before freezing.
- Drizzle extra melted peanut butter over the chocolate coating.
🍓 Fruit-Infused Pops
- Add a thin layer of fruit jam inside the mold before filling with ice cream.
- Swirl in fresh pureed strawberries, raspberries, or mango for a fruity burst.
These customizations make each batch of Homemade Eskimo Pie Popsicles unique and perfect for any occasion!
The Perfect Chocolate Coating for Eskimo Pie Popsicles
A Homemade Eskimo Pie Popsicle isn’t complete without its signature chocolate shell crisp, smooth, and perfectly hardened over creamy ice cream. Achieving this requires the right ingredients, melting techniques, and dipping methods. Follow these steps to master the perfect chocolate coating for your popsicles.
Tips for Achieving a Smooth and Even Chocolate Shell
✔ Use High-Quality Chocolate
- Choose semi-sweet, dark, or milk chocolate with at least 50% cocoa for a rich flavor.
- Avoid low-quality or overly sweet chocolate, as it can result in a grainy texture.
✔ Melt the Chocolate Slowly
- Use a double boiler (a heatproof bowl over simmering water) for gentle melting.
- If using a microwave, heat in 15-second intervals, stirring each time to prevent burning.
✔ Thin the Chocolate for a Perfect Shell
- Add 1–2 tablespoons of coconut oil or melted cocoa butter to the chocolate.
- This creates a silky-smooth texture that hardens evenly without cracking.
✔ Dip Quickly & Evenly
- Work with completely frozen popsicles—otherwise, the chocolate won’t stick properly.
- Dip each popsicle straight down into the melted chocolate, then immediately pull it out.
- Let excess chocolate drip off, and place the popsicle on parchment paper to set.
✔ Sprinkle Toppings Immediately
- If adding toppings like nuts, coconut flakes, or crushed cookies, sprinkle them before the chocolate hardens.
- This ensures the toppings stick perfectly to your Homemade Eskimo Pie Popsicle.
How to Customize the Chocolate Flavor for Your Popsicles
Elevate the chocolate coating with flavor infusions and mix-ins for a gourmet twist:
✔ Vanilla or Cinnamon Twist
- Add ½ teaspoon of vanilla extract or a pinch of cinnamon to melted chocolate for a subtle flavor boost.
✔ Espresso-Infused Chocolate
- Stir in 1 teaspoon of instant coffee powder to enhance the deep chocolate flavor.
✔ Sea Salt & Dark Chocolate
- Sprinkle flaky sea salt over the chocolate for a sweet-salty contrast.
✔ White Chocolate & Berry Drizzle
- Melt white chocolate and drizzle it over dark chocolate-coated popsicles.
- Add raspberry or blueberry puree for a tangy finish.
These customizations allow you to personalize your Homemade Eskimo Pie Popsicle and experiment with gourmet flavors.
Essential Tools for Making Homemade Eskimo Pie Popsicles
Creating the perfect Homemade Eskimo Pie Popsicle is much easier when you have the right tools. While this recipe doesn’t require fancy equipment, a few essential kitchen gadgets can help you achieve professional-quality popsicles with minimal effort.
Must-Have Equipment for Popsicle Success
✔ Popsicle Molds
- Silicone popsicle molds are the best choice because they release popsicles easily without breaking.
- If using plastic molds, run warm water over them for a few seconds to loosen the popsicles.
✔ Wooden Popsicle Sticks
- Sturdy wooden sticks provide a classic look and good grip when dipping the popsicles in chocolate.
✔ Microwave-Safe Bowl or Double Boiler
- A double boiler (a heatproof bowl over simmering water) ensures gentle, even melting of chocolate.
- A microwave-safe bowl works too, but melt in 15-second intervals to avoid burning.
✔ Small Spatula or Whisk
- Helps stir the chocolate to maintain a smooth consistency without lumps.
✔ Parchment Paper & Freezer Tray
- After dipping, lay popsicles on parchment paper to prevent them from sticking together.
- A flat tray ensures popsicles freeze evenly.
✔ Sharp Knife for Custom Add-Ins
- Easily chop nuts, fruit, or chocolate chips to mix into the popsicle base or use as toppings.
Alternatives to Traditional Popsicle Molds
Don’t have popsicle molds? No problem! Here are some creative alternatives to make Homemade Eskimo Pie Popsicles without them:
✔ Small Paper Cups
- Fill small disposable cups with the ice cream mixture, insert wooden sticks, and freeze.
- Peel away the cup once frozen for a homemade-style popsicle.
✔ Silicone Cupcake Molds
- These molds work well for mini-sized popsicles that are easy to remove.
✔ Ice Cube Trays
- Create bite-sized versions of the Homemade Eskimo Pie Popsicle—perfect for snacking or party treats!
✔ Yogurt Containers
- Repurpose small yogurt cups by pouring in the mixture and inserting a popsicle stick.
✔ Chopsticks or Sturdy Straws Instead of Wooden Sticks
- If you run out of popsicle sticks, use chopsticks or firm paper straws as a last-minute replacement.
These alternatives ensure you can still enjoy Homemade Eskimo Pie Popsicles even if you don’t own popsicle molds!
Flavor Variations for Your Eskimo Pie Popsicle Recipe
One of the best things about making a Homemade Eskimo Pie Popsicle is the ability to customize flavors. While the classic vanilla and chocolate-dipped combo is always a favorite, adding fruity layers, nutty textures, or unique mix-ins can take your popsicles to the next level.
Adding Fruity Layers to Your Popsicles
For a refreshing twist, incorporate fruit layers or swirls into your Homemade Eskimo Pie Popsicle.
✔ Fruit Puree Layers
- Blend fresh or frozen strawberries, raspberries, or mango into a smooth puree.
- Pour a thin layer of fruit puree into the molds before adding ice cream.
- Freeze the fruit layer for 10 minutes before adding the next layer to create a beautiful striped effect.
✔ Marbled Fruit Swirls
- Gently swirl fruit puree into softened ice cream before pouring it into molds.
- Use a spoon or toothpick to create a marbled effect for a visually stunning popsicle.
✔ Whole Fruit Pieces
- Add blueberries, diced kiwi, or pomegranate seeds for extra bursts of flavor.
- Press fruit pieces gently into the ice cream to ensure even distribution.
Best Fruit Combinations for Eskimo Pie Popsicles:
✔ Strawberry & Dark Chocolate – Sweet and tangy contrast.
✔ Mango & Coconut – Tropical and creamy.
✔ Raspberry & White Chocolate – Tart meets rich sweetness.
Nutty and Crunchy Toppings to Enhance Your Treats
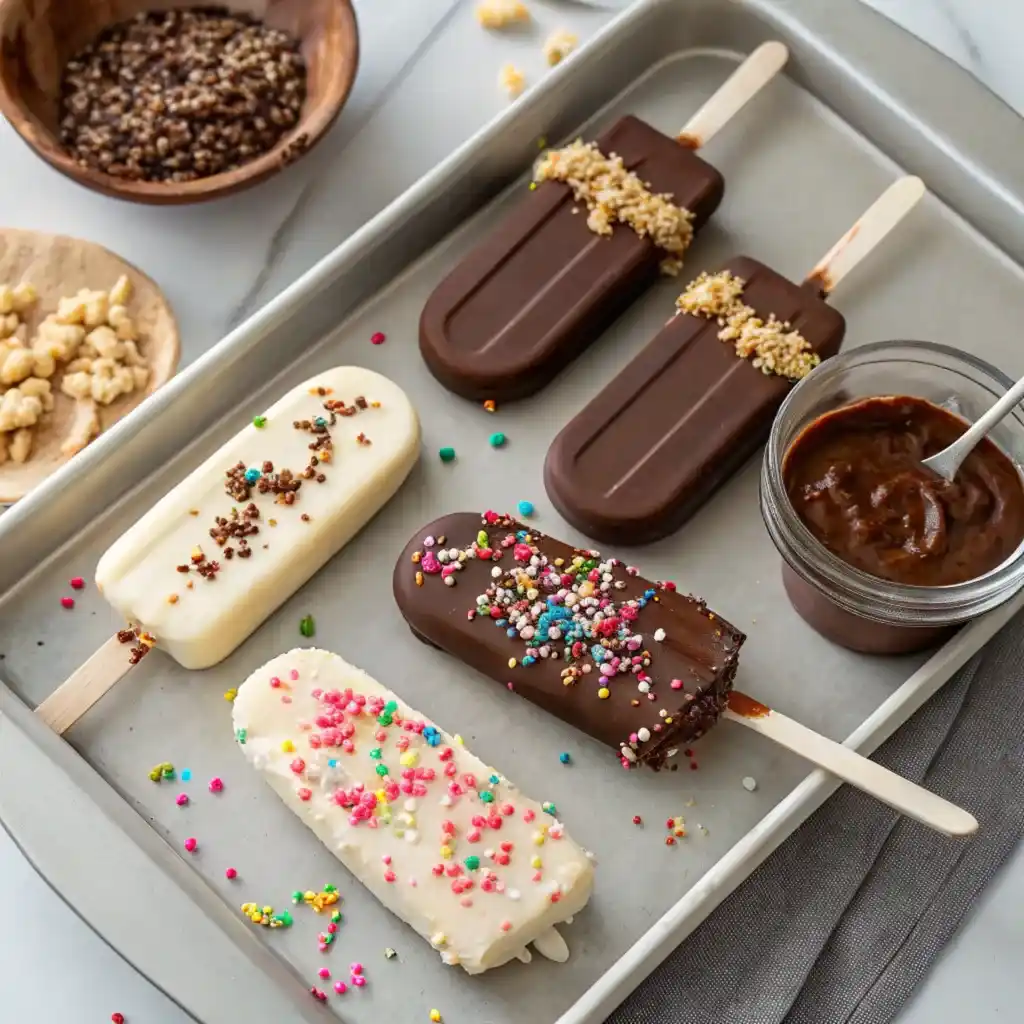
If you love texture and crunch, adding nuts and cookie crumbs to your chocolate coating makes each bite even more satisfying.
✔ Chopped Nuts
- Finely chop almonds, peanuts, or hazelnuts, then sprinkle them over the chocolate shell before it hardens.
- Lightly press the nuts into the coating so they stick properly.
✔ Crushed Cookies & Pretzels
- For a salty-sweet contrast, sprinkle crushed pretzels or graham crackers on top.
- Oreo crumbs or shortbread pieces create a cookies-and-cream flavor.
✔ Coconut & Granola
- Toasted shredded coconut gives a tropical flavor.
- Granola adds a breakfast-inspired crunch.
✔ Mini Chocolate Chips & Drizzles
- Press mini chocolate chips into the coating for extra richness.
- Drizzle melted peanut butter or caramel over the popsicle before serving.
These crunchy add-ins turn a Homemade Eskimo Pie Popsicle into a gourmet frozen dessert!
Decadent Flavor Twists to Try
Take your Homemade Eskimo Pie Popsicle to the next level with these exciting variations:
✔ 🍫 Mocha Espresso Popsicles
- Stir 1 teaspoon of instant coffee powder into the chocolate coating for a bold coffee flavor.
- Sprinkle with crushed espresso beans for an extra kick.
✔ 🍌 Chocolate Banana Pops
- Blend ripe bananas into the ice cream base for a naturally sweet twist.
- Coat in chocolate and top with chopped peanuts for a frozen banana-inspired treat.
✔ 🥜 Peanut Butter Chocolate Delight
- Swirl melted peanut butter into softened ice cream before freezing.
- Dip in chocolate and top with crushed peanuts for a Reese’s-inspired treat.
✔ 🍪 Cookies & Cream Popsicles
- Crush Oreos or chocolate cookies and mix them into the ice cream before freezing.
- Dip in white chocolate for an extra creamy finish.
✔ 🍊 Chocolate Orange Pops
- Add 1 teaspoon of orange zest to the melted chocolate for a bright citrus twist.
- Top with candied orange peel for a gourmet touch.
These custom flavor variations make each Homemade Eskimo Pie Popsicle unique and perfect for every taste preference.
Storage and Serving Tips for Homemade Eskimo Pie Popsicles
Proper storage and presentation make all the difference when enjoying your Homemade Eskimo Pie Popsicles. Whether you’re making them ahead for a treat anytime or serving them at a party, these tips will keep them fresh, firm, and visually appealing.
How to Keep Your Popsicles Fresh and Delicious
✔ Wrap Each Popsicle Individually
- Wrap each frozen popsicle in parchment paper or plastic wrap before storing them together.
- This prevents them from sticking to each other and protects them from freezer burn.
✔ Use an Airtight Container
- Place the wrapped popsicles in an airtight container to maintain their texture and prevent freezer odors from affecting the flavor.
- For best results, store them in single layers with parchment paper between them.
✔ Store in the Coldest Part of the Freezer
- Keep popsicles away from the freezer door to prevent temperature fluctuations that could cause melting and refreezing.
- Store at 0°F (-18°C) or lower for maximum freshness.
✔ How Long Do Homemade Eskimo Pie Popsicles Last?
- Best enjoyed within 2 weeks for the freshest taste and texture.
- After 3–4 weeks, the chocolate shell may lose its crispness, but the popsicles will still be safe to eat.
Presentation Ideas to Wow Your Guests
Serving Homemade Eskimo Pie Popsicles in a creative way makes them even more enjoyable. Here are some fun and stylish serving ideas:
✔ 🎨 Drizzle & Decorate
- Just before serving, drizzle extra melted chocolate, caramel, or peanut butter over the popsicles for a gourmet finish.
- Sprinkle with crushed nuts, shredded coconut, or sea salt for an elegant touch.
✔ ❄️ Display on a Chilled Platter
- Place popsicles on a tray filled with crushed ice to keep them cold longer when serving at parties.
- Use a decorative plate or cake stand lined with parchment paper for a stylish dessert table setup.
✔ 🍹 Serve with Dipping Sauces
- Offer a small bowl of warm chocolate, peanut butter, or caramel sauce so guests can dip or drizzle their popsicles.
✔ 🍓 Create a Popsicle Bar
- Set up a DIY popsicle bar with bowls of toppings like:
- Chopped nuts
- Mini chocolate chips
- Crushed cookies
- Sprinkles
- Fresh fruit pieces
- Let guests customize their popsicle before enjoying!
✔ 🎁 Wrap for Gifts
- For a fun gift or party favor, wrap each Homemade Eskimo Pie Popsicle in a clear cellophane bag and tie it with a ribbon.
- Perfect for summer parties, birthdays, or special occasions!
These storage and serving ideas ensure that your Homemade Eskimo Pie Popsicles stay fresh, delicious, and visually appealing every time.
Creating Vegan and Dairy-Free Homemade Eskimo Pie Popsicle
You don’t have to miss out on the creamy, chocolate-dipped goodness of a Homemade Eskimo Pie Popsicle just because you’re avoiding dairy! With the right plant-based ingredients, you can create a rich, satisfying frozen treat that’s completely vegan and dairy-free.
Plant-Based Ingredients for the Perfect Homemade Eskimo Pie Popsicle
To make dairy-free and vegan Eskimo Pie popsicles, swap out traditional dairy ingredients for plant-based alternatives that still offer creaminess and flavor.
✔ Non-Dairy Ice Cream Base Options
- Coconut Milk – Creates a rich, creamy texture with a hint of coconut flavor.
- Almond Milk – A light, nutty alternative that blends well with vanilla or chocolate flavors.
- Cashew Cream – Provides extra creaminess and a buttery texture.
- Oat Milk – Naturally sweet and smooth, perfect for neutral-flavored popsicles.
✔ Natural Sweeteners for Dairy-Free Popsicles
- Maple Syrup – A gentle sweetness with a slight caramel flavor.
- Agave Syrup – Light and easy to blend with any ice cream base.
- Medjool Dates – Blend dates with coconut milk for a naturally sweet popsicle base.
✔ Egg-Free & Dairy-Free Binders
- Use blended banana or avocado to create a thicker, creamier texture.
- Soaked cashews blended with almond milk create a smooth, velvety consistency.
These non-dairy ingredients ensure your Homemade Eskimo Pie Popsicle is just as creamy and delicious as the original!
Dairy-Free Chocolate Alternatives for Coating
The classic chocolate shell can easily be made vegan and dairy-free while still keeping its rich, smooth texture.
✔ Best Vegan Chocolate Options
- Dark chocolate (70% cocoa or higher) – Most high-quality dark chocolates are naturally dairy-free.
- Vegan Chocolate Chips – Brands like Enjoy Life or Hu Kitchen offer dairy-free chocolate chips that melt beautifully.
- Cacao Powder + Coconut Oil – A simple homemade chocolate coating!
✔ How to Make Vegan Chocolate Coating
- Melt 1 cup of dark chocolate chips with 1–2 tablespoons of coconut oil over low heat.
- Stir in a dash of vanilla extract or a pinch of sea salt for extra flavor.
- Dip frozen popsicles into the melted chocolate and let them set on parchment paper.
✔ Dairy-Free Flavor Twists for the Chocolate Coating
- Add ½ teaspoon of orange zest for a chocolate-orange twist.
- Stir in ½ teaspoon of peppermint extract for a minty Eskimo Pie Popsicle.
- Drizzle with nut butter for an extra indulgent touch.
Fun Vegan Flavor Variations to Tr
✔ 🍓 Strawberry Coconut Popsicles
- Blend 1 cup of coconut milk with ½ cup of fresh strawberries and 1 tablespoon of maple syrup.
- Freeze in popsicle molds and dip in vegan chocolate coating.
✔ 🍫 Chocolate Peanut Butter Popsicles
- Blend oat milk, cocoa powder, and a spoonful of peanut butter for a rich, nutty popsicle base.
- Coat in vegan dark chocolate and sprinkle crushed peanuts on top.
✔ 🥥 Almond Joy-Inspired Popsicles
- Use coconut milk, vanilla extract, and maple syrup for the ice cream base.
- Dip in vegan chocolate and sprinkle with shredded coconut and chopped almonds.
✔ ☕ Mocha Espresso Popsicles
- Blend cold brew coffee, almond milk, and cocoa powder for a bold, dairy-free treat.
- Dip in dark chocolate and top with crushed espresso beans.
These vegan variations prove that a Homemade Eskimo Pie Popsicle can be just as creamy, flavorful, and indulgent without any dairy!
Frequently Asked Questions (FAQs)
How do you make Homemade Eskimo Pie Popsicles creamy instead of icy?
To ensure your Homemade Eskimo Pie Popsicle is creamy, not icy, follow these tips:
✔ Use full-fat ingredients – Full-fat milk, coconut milk, or heavy cream creates a smooth texture.
✔ Avoid too much water – Watery liquids like fruit juice can make popsicles icy instead of creamy.
✔ Blend thoroughly – Ensure the base is well-mixed before pouring into molds.
✔ Freeze slowly – A slow, even freeze helps maintain creaminess.
For extra richness, mix in yogurt, blended banana, or nut butter to create a smoother, richer base.
What is the best chocolate for coating Homemade Eskimo Pie Popsicles?
For a rich and crisp chocolate shell, use:
✔ Semi-sweet chocolate (balanced sweetness, classic taste).
✔ Dark chocolate (70% cocoa or higher) (deep, intense flavor).
✔ Milk chocolate (if you prefer a sweeter taste).
Pro Tip: Add 1–2 tablespoons of coconut oil to the melted chocolate for a silky-smooth finish and perfect shell hardening.
How long should I freeze Homemade Eskimo Pie Popsicles?
For best results, freeze popsicles for at least 6 hours, or preferably overnight.
✔ If they aren’t fully frozen, they may fall apart when dipped in chocolate.
✔ Use a flat tray to prevent uneven freezing and misshaped popsicles.
How do I prevent chocolate from cracking when coating popsicles?
✔ Ensure the popsicles are completely frozen before dipping.
✔ Thin the chocolate with coconut oil for a smoother, flexible coating.
✔ Dip quickly and remove immediately, allowing excess chocolate to drip off.
✔ Let popsicles set on parchment paper, not on metal, to prevent sticking.
Following these steps ensures your Homemade Eskimo Pie Popsicle gets a perfectly smooth, crack-free chocolate coating.
How can I make Homemade Eskimo Pie Popsicles without a mold?
No popsicle mold? No problem! Try these alternatives:
✔ Small paper cups – Fill, insert a popsicle stick, and peel off when frozen.
✔ Silicone cupcake liners – Great for mini popsicle bites.
✔ Ice cube trays – Make bite-sized versions of the classic treat.
✔ Yogurt containers – Repurpose small yogurt cups for a larger popsicle size.
These alternatives ensure you can still enjoy a Homemade Eskimo Pie Popsicle even without a traditional mold.
Can I store Homemade Eskimo Pie Popsicles for later?
Yes! Follow these storage tips for long-lasting freshness:
✔ Wrap each popsicle individually in parchment paper or plastic wrap to prevent sticking.
✔ Store in an airtight container to avoid freezer burn.
✔ Keep in the coldest part of the freezer (not near the door) to maintain a solid texture.
For best taste and texture, enjoy your Homemade Eskimo Pie Popsicles within 2 weeks.
Can I make a low-sugar or keto version of Homemade Eskimo Pie Popsicles?
Yes! To make a low-carb/keto version, use:
✔ Unsweetened coconut milk or heavy cream instead of dairy milk.
✔ Sugar-free chocolate for coating.
✔ Stevia, monk fruit, or erythritol as sweeteners instead of sugar.
For a keto-friendly treat, try a chocolate-almond butter popsicle coated in sugar-free dark chocolate.
Can I make Homemade Eskimo Pie Popsicles vegan?
Absolutely! To make vegan Homemade Eskimo Pie Popsicles, use:
✔ Dairy-Free Ice Cream Base: Coconut milk, oat milk, or cashew cream.
✔ Vegan Chocolate Coating: Dark chocolate with coconut oil.
✔ Natural Sweeteners: Maple syrup or agave instead of honey.
Check out our vegan recipe section for more dairy-free and plant-based variations!
Wrap Up Your Homemade Eskimo Pie Adventure with Style
Congratulations! You now have everything you need to make the best Homemade Eskimo Pie Popsicle right in your own kitchen. From choosing the perfect chocolate coating to experimenting with flavors and toppings, this guide has covered all the essential tips for creating a rich, creamy, and indulgent frozen treat.
For an extra rich and creamy base, take inspiration from our guide on the best cream for crème brûlée. The tips there can help you achieve the smooth texture you’re craving in your popsicles.
Finally, enjoy the satisfaction of creating something so tasty and homemade. You’re going to love every bite! If you had fun making these, why not try more recipes? Stay creative, and keep exploring new flavors. Your sweet tooth will thank you!