
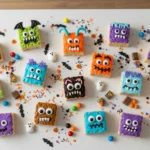
Halloween Monster Rice Krispies are the no-bake, crowd-pleasing treats your spooky season needs. This 30-minute recipe delivers soft, chewy bars with playful monster faces—think candy eyeballs, fun colors, and silly drizzles—without turning on the oven. The base is extra-gooey (but still sliceable), and the decorating is a total blast for kids and adults. If you’re hosting a party, pulling together a last-minute classroom treat, or building a dessert board, these Halloween Monster Rice Krispies will steal the show.
At a Glance
- Servings: 24 small bars (or 12 large)
- Prep Time: 15 minutes
- Cook Time: 10 minutes
- Total Time: 25–30 minutes
- Difficulty: Easy
- Estimated Cost: $10–$14 (varies by candy and cereal brand)
Halloween Monster Rice Krispies
- Total Time: 30 minutes
- Yield: 24 small bars or 12 large bars 1x
- Diet: Vegetarian
Description
Halloween Monster Rice Krispies are the no-bake, crowd-pleasing treats your spooky season needs. This 30-minute recipe delivers soft, chewy bars with playful monster faces—think candy eyeballs, fun colors, and silly drizzles—without turning on the oven.
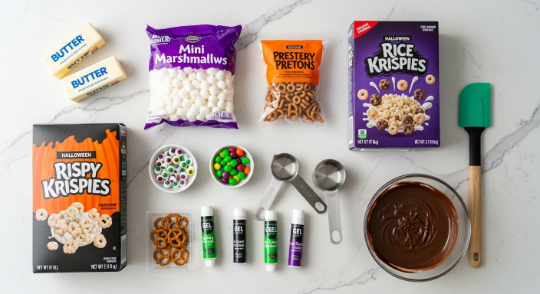
Ingredients
- 8 Tbsp (1 stick/½ cup/113 g) unsalted butter
- 20 oz (567 g) mini marshmallows, divided (16 oz to melt + 4 oz to fold in)
- 1 tsp pure vanilla extract
- Big pinch fine sea salt (⅛ tsp)
- 6 to 7 cups (170–200 g) crispy rice cereal
- Gel food coloring (green, purple, orange, or your choice)
- 1–1½ cups candy eyeballs
- ½ cup mini chocolate chips or mini M&M’s (optional)
- ½ cup pretzel sticks, broken (optional)
- ½ cup candy melts or melted chocolate for drizzling (black, white, or orange)
Instructions
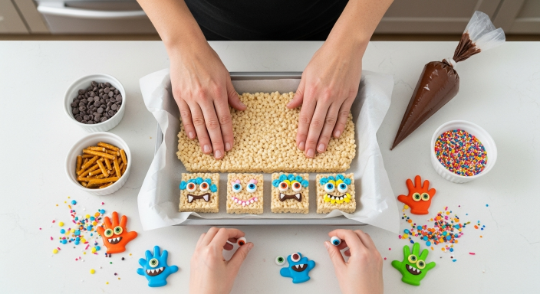
- Line a 9×13-inch pan with parchment and lightly grease it along with a silicone spatula.
- In a large pot over low heat, melt the butter. Add 16 oz marshmallows and stir until smooth. Remove from heat and stir in vanilla and salt.
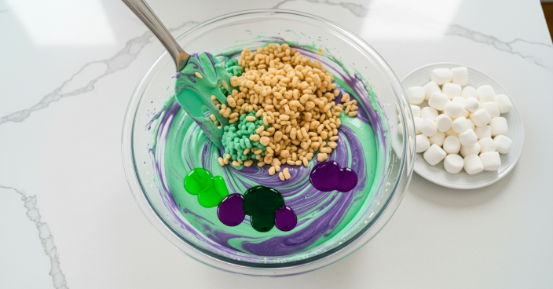
- Add gel food coloring. Fold in 6 cups crispy rice cereal (up to 7 if needed). Optionally fold in remaining 4 oz marshmallows for gooey pockets.
- Press mixture gently into prepared pan. While still tacky, add candy eyeballs, pretzels, chocolate chips/M&M’s, and drizzle candy melts or melted chocolate.
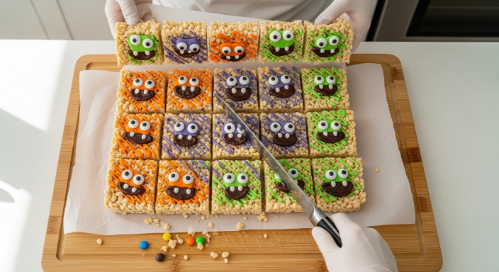
- Let set 10–15 minutes. Lift out using parchment and slice into squares. Serve or store airtight.
Notes
For swirled colors, divide and tint two batches, then lightly swirl in pan. To make monster shapes, use cookie cutters. To store, keep at room temp 2–3 days in airtight container. Microwave 5–8 seconds to soften if needed.
- Prep Time: 15 minutes
- Cook Time: 10 minutes
- Category: Dessert
- Method: No-Bake
- Cuisine: American
Nutrition
- Serving Size: 1 bar
- Calories: 180
- Sugar: 14g
- Sodium: 85mg
- Fat: 5g
- Saturated Fat: 3g
- Unsaturated Fat: 2g
- Trans Fat: 0g
- Carbohydrates: 32g
- Fiber: 0g
- Protein: 1g
- Cholesterol: 10mg
Keywords: halloween, monster, rice krispies, no-bake, party treat, candy eyeballs
Table of Contents
Ingredients
- 8 Tbsp (1 stick/½ cup/113 g) unsalted butter
- 20 oz (567 g) mini marshmallows, divided (about two 10 oz bags)
- Use 16 oz (454 g) to melt + reserve 4 oz (113 g) to fold in at the end for extra gooey pockets (optional)
- 1 tsp pure vanilla extract
- Big pinch fine sea salt (⅛ tsp)
- 6 to 7 cups (170–200 g) crispy rice cereal
- Gel food coloring (green, purple, orange, or your choice)
- 1–1½ cups candy eyeballs (look for gelatin-free or vegan if needed)
- ½ cup mini chocolate chips or mini M&M’s (optional)
- ½ cup pretzel sticks, broken (optional—great for “monster hair”)
- ½ cup candy melts or melted chocolate for drizzling (black, white, or orange)
Swaps & Notes
- Gluten-free: Standard rice cereal often contains malt (barley). Choose a certified gluten-free crispy rice cereal.
- Gelatin-free/vegan: Use vegan marshmallows and plant-based butter. Choose gelatin-free eyeballs or DIY eyes with white chocolate chips + mini chocolate chip “pupils.”
- Dairy-free: Swap butter for plant-based butter sticks (not spread).
- Less sweet: Use 18 oz marshmallows and 7 cups cereal.
- Coloring: Gel coloring works best (more vibrant, less liquid). Divide the batch for multiple colors if you’d like.
Step-by-Step Instructions
Prep the pan & tools
Line a 9×13-inch (23×33 cm) pan with parchment, leaving an overhang. Lightly grease the parchment and a silicone spatula.

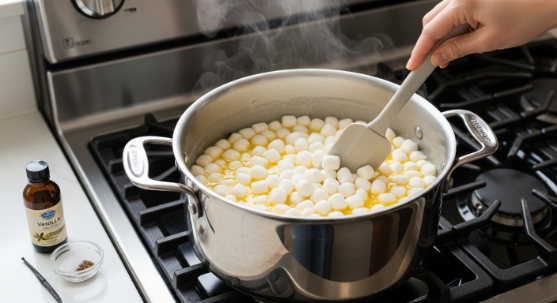
Melt butter & marshmallows (low & slow)
In a large pot over low heat, melt ½ cup (1 stick) butter. Add 16 oz mini marshmallows and stir until smooth. Remove from heat; stir in 1 tsp vanilla and a pinch of salt.
Tint & mix with cereal
Add gel food coloring (one color or divide and tint multiple bowls). Fold in 6 cups crispy rice cereal (add up to 1 more cup if needed). For extra gooey pockets, fold in 4 oz mini marshmallows briefly.
Press & decorate monsters
Gently press mixture into the prepared pan (don’t compact too hard). While still tacky, add candy eyeballs, pretzel “hair,” mini chips or M&M’s. Drizzle melted candy melts or chocolate.
Set, lift & slice
Let stand 10–15 minutes. Lift using parchment and slice into squares (wipe knife between cuts). Serve or pack airtight.
Pro Tips & Variations
- Low & slow heat: Melting marshmallows on low heat preserves that signature soft-chewy bite.
- Don’t overpack: Press just enough to level the top. Overpressing = hard, dense bars.
- Swirled colors: Divide the mixture into two tinted colors and press into the pan side-by-side. Lightly swirl with a greased spatula for a marbled monster effect.
- Monster shapes: Use greased cookie cutters (pumpkin, ghost, bat) to stamp shapes. Re-press scraps gently and continue.
- On a stick: Press the mixture slightly thicker, cut into rectangles, and insert popsicle sticks for “monster-on-a-stick” treats.
- Chocolate-dipped edges: Dip one side of each square in melted chocolate, then add sprinkles or crushed cookies for texture.
- Nut-free school safe: Skip nuts and use safe sprinkles/candies according to your school’s policy.
- Allergy-aware eyes: If you can’t find gelatin-free candy eyes, pipe small white dots of melted white chocolate on parchment, then add mini chocolate chips as pupils. Let set and use!
Serving Suggestions
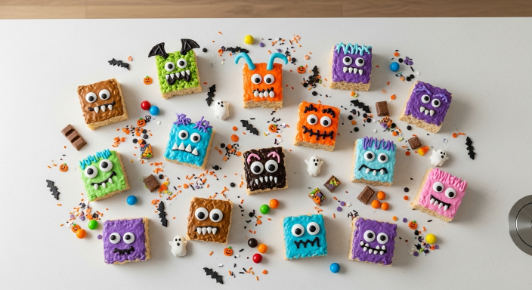
- Arrange on a black slate board with gummy worms, candy corn, and fresh orange slices for a bright Halloween buffet.
- Tuck a square into lunchboxes the week of Halloween for a festive surprise.
- Pair with hot cocoa, hot apple cider, or a pumpkin-spice milkshake for cozy vibes.
- Build a DIY monster station: set out bars plus bowls of eyeballs, pretzels, and drizzles so guests can decorate their own.
Storage & Reheating
- Room temperature: Store in an airtight container at cool room temp for 2–3 days. Layer with parchment to prevent sticking.
- Softening tip: If bars firm up, microwave a piece for 5–8 seconds to revive the chew.
- Freezing (okay in a pinch): Wrap bars individually in plastic, then place in a freezer bag for up to 1 month. Thaw at room temp in the wrapper. Note: freezing can slightly change the texture—room-temp storage is best.
Troubleshooting
- Bars turned hard: Marshmallows were overheated or mixture was packed too firmly. Next time, keep heat low and press gently.
- Too sticky to handle: Lightly grease hands/tools or use damp fingers.
- Crumbly, not holding together: Too much cereal. Add less next round (start with 6 cups) or mix in an extra handful of melted marshmallows.
- Decorations won’t stick: Press candies on while still warm or “glue” with a small dab of melted chocolate.
- Colors look dull: Use gel food coloring, not liquid. Start with a small amount and build to your desired shade.
- Need gluten-free or pork-free: Choose certified GF cereal and vegan marshmallows; use gelatin-free candy eyes or DIY with chocolate.